API Onboarding: Project creation under the Freemium model

Index
In this part, we will go through the steps required to create a project in QAPi and how to navigate the application.
Want to know what is QAPi and how to get started with it? Read here.
We’ll guide you through the API testing process using our platform. Whether you prefer importing URLs, creating APIs manually, or uploading files, our platform offers the flexibility to meet your diverse project needs.
Let’s dive into the step-by-step procedure of setting up your project under the freemium model.
API Onboarding Index
| Project Creation under the Freemium model |
| Type 1: Import URL |
| Type 2: Create Manually |
| Type 3: Upload File |
| Test Suite Creation |
| Conclusion |
To accommodate diverse project requirements, our platform provides three methodologies for creating APIs in your Test Suite. This flexibility ensures you can select the approach most compatible with your workflow.
Step 1: From the dashboard, click on ‘Playground’.
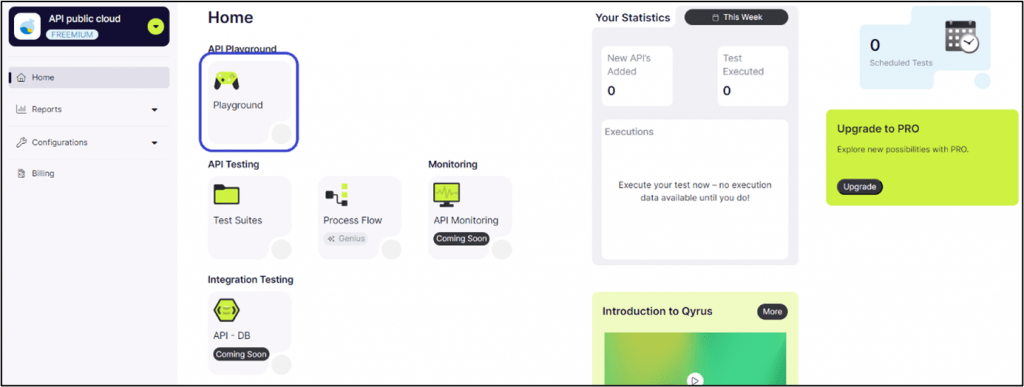
Step 2: Click on ‘Add APIs’

Note: If you want to know more about the Qyrus platform, you can click on ’Know More’ to learn about API, project-setup, functional-testing, API-process testing, Advanced-features, and FAQs.
Type 1: Import URL
One efficient method of creating APIs is through URL imports. This process supports two primary formats: Swagger and WSDL*. Depending on your project’s specifications, you can choose the format that best aligns with your requirements.
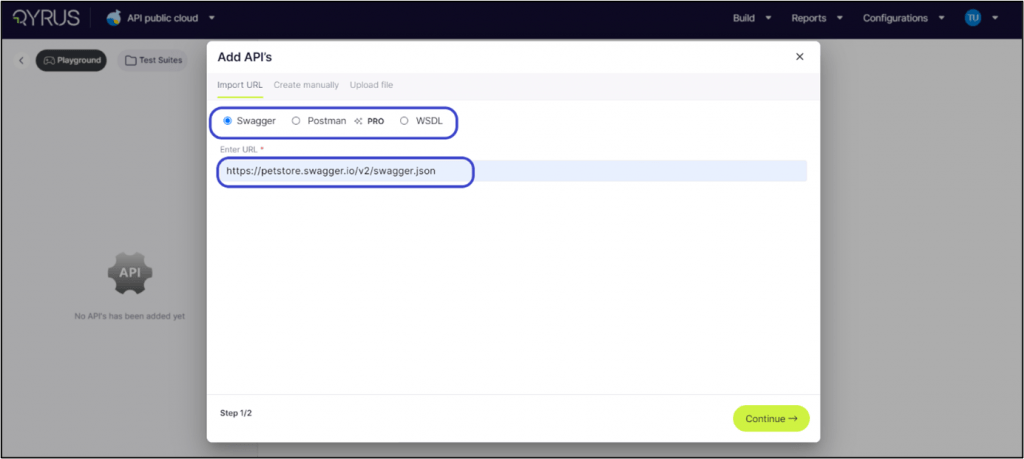
Option 1: Using Swagger Format
Step 1: In the import section, click on “Swagger” if you’re using the Swagger format for your API.
Step 2: Input the Swagger URL:
In the provided field, type in the URL of your Swagger file. To practice or see how it works, for example, let’s use https://petstore.swagger.io/v2/swagger.json. This sample URL shows you how the process works with a real example.
Step 3: Click ‘Continue’:
This tells the platform to start fetching your API’s details from the Swagger file you specified.
The platform will now take a moment to process the URL and add your API to your Test Suite. It will read the Swagger file and set up your API so you can start working with it.
Step 4: Select all the Endpoints to add to testing and click on ‘Add to test’.

Once you successfully import your APIs using the URL method, the platform will navigate you to a comprehensive dashboard.
This dashboard is where you can manage all your imported APIs effectively.
Let’s dive into how you can edit, create, delete, modify, and send these APIs to meet your project requirements.
Navigating Your API Dashboard
Upon arrival at the API dashboard, you’ll notice the platform has organized your APIs neatly. Here’s how to get started with managing them:
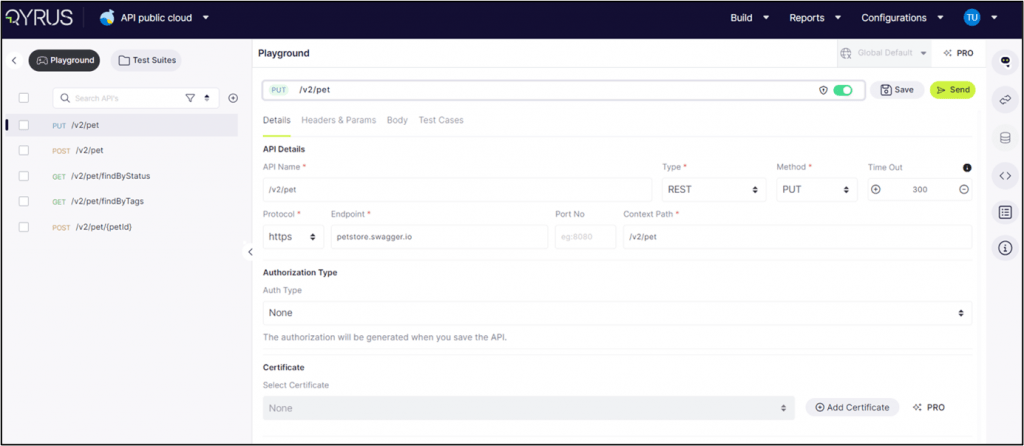
Accessing Your APIs: On the left side of the screen, you’ll find a list of all your imported APIs. This list is your gateway to manage each API individually.
Exploring API Options: Click on any API from the list to select it. Once selected, look for the three dots (more options) next to the API name. Clicking here will reveal a menu with various actions you can perform.

Saving to Test Suite: First, click on ‘Save to test Suite’ to add an API to a specific Test Suite.
A pop-up box will ask you to name your Test Suite if you haven’t already created one.
Do this by typing the name into the field provided and clicking the tick box to confirm.
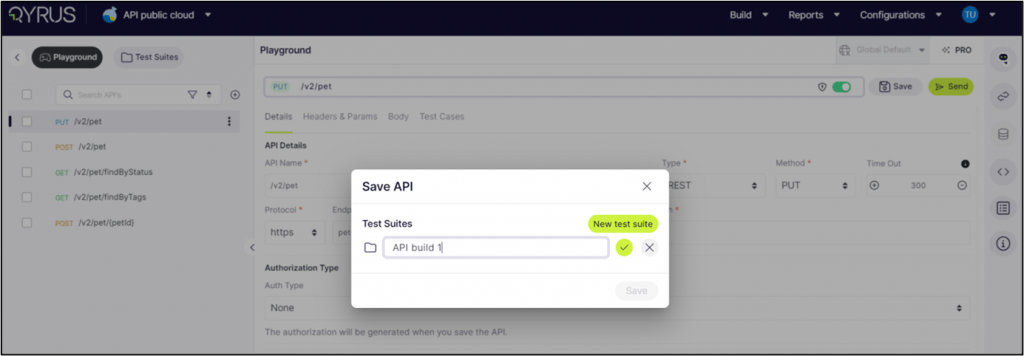
If you’ve previously set up a Test Suite, you can save your API by selecting it from the dropdown menu.
Cloning an API: Cloning is handy when you want to create a similar API with slight modifications. Select ‘Clone’ to make an exact copy of the selected API, which you can edit as needed.
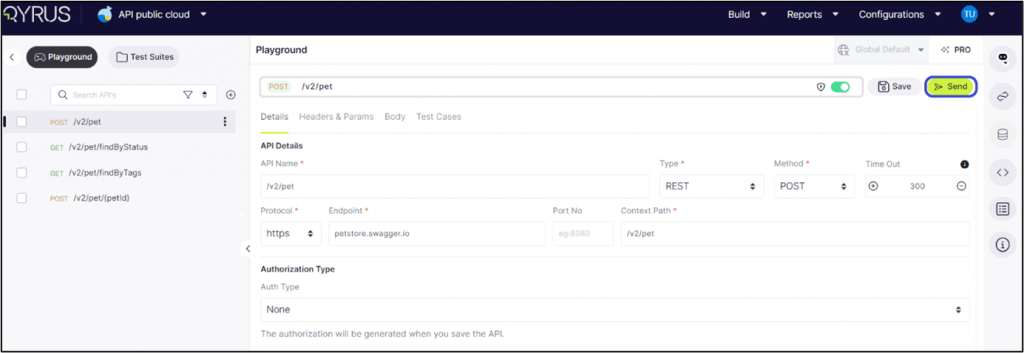
Sending an API: This option helps you test your API’s functionality in real-time. Choose ‘Send’ to execute the API call and view the response, which helps you validate its performance.
You can also click on the send button highlighted in the image below.
It will open the response tab, showing:
Status: If the server has successfully processed the request, it will show OK as a successful interaction, the standard response for successful HTTP requests.
Size: The total size of the response data sent from the server, including headers and body content. It gives an idea of the payload’s weight, which can impact load times and performance, especially in data-intensive applications.
Time: The duration taken for the request to be sent, processed, and for the response to be received. It is a critical metric for assessing the efficiency and speed of the API, highlighting the system’s responsiveness.
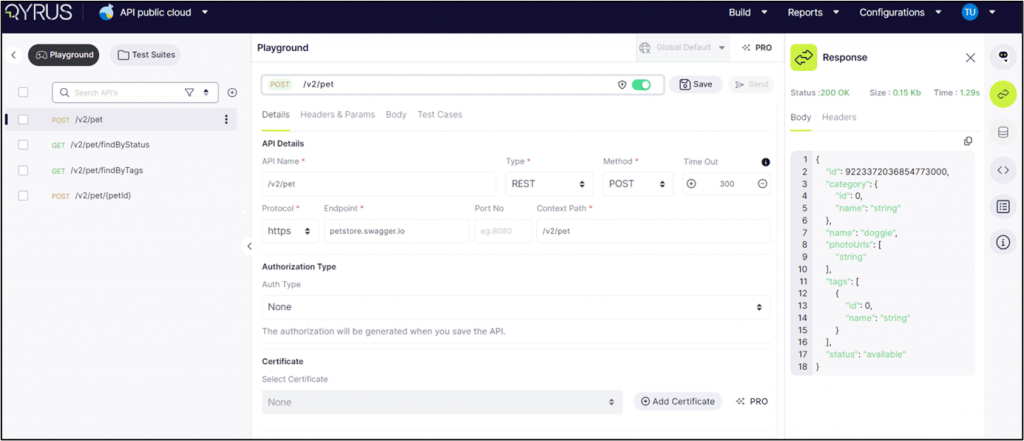
Users can review the body of the response, often shown in the format specified (such as JSON, XML, etc.), to assess the API’s behavior and validate its output against expected results. This immediate feedback is crucial for debugging and optimizing API functionality.
Deleting an API: If an API is no longer needed or was added by mistake, selecting the ‘Delete’ icon will remove it from your dashboard.
To add more APIs, click on the Add Icon.

Modifying API
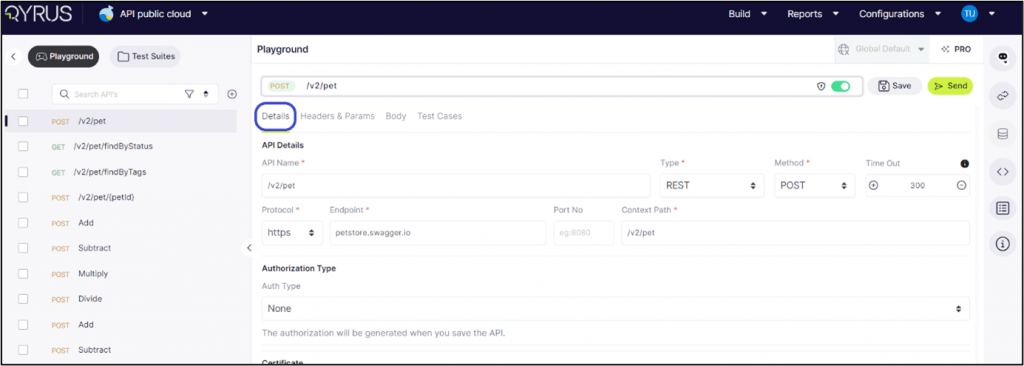
Select an API: The main screen will display all its intricate details under the ‘Details’ tab. Here, you can modify the API to fit your exact needs:
API Name and Type: Users can view the API’s name and select its type (REST, SOAP) to ensure proper handling within the platform.
Method Selection: Users can designate the appropriate method (GET, POST, PUT, DELETE, PATCH) based on the desired action the API should perform, thereby defining its interaction with the server.
Timeout Setting: Users have the option to set a timeout in milliseconds.
Protocol Configuration: The platform facilitates toggling between HTTP and HTTPS protocols, allowing users to secure API calls by opting for HTTPS where applicable.
Endpoint and Context Path: In this section, users can modify the API’s endpoint URL and specify the context path, which is essential for accurately directing API calls.
Authorization Type: Users can select the authorization type that aligns with the API’s security requirements, ensuring secure interactions, whether it involves Basic Auth or OAuth. The authorization will be generated when you save the API.

In the Headers and Params tab, users can add, delete, and modify both the key and value, as well as the type of each parameter. This functionality allows for precise customization and configuration of API requests, ensuring accurate and effective testing.
Within the Body tab, users have several options for inputting data. They can choose to enter the code directly or upload a file.
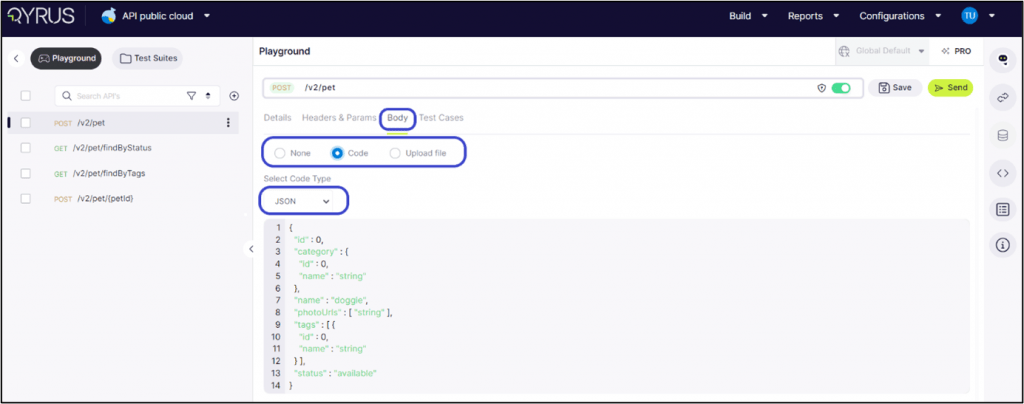
When selecting the code option, users can specify the type of code they input, including JSON, XML, Text, or GraphQL.
Generate Use Cases with NOVA
Under the ‘Test Cases’ tab, users are presented with options to define test cases for Header Assertions, and the body of the API request or response. This functionality allows for thorough testing and validation of various aspects of the API’s behavior, ensuring reliability and consistency in its performance.
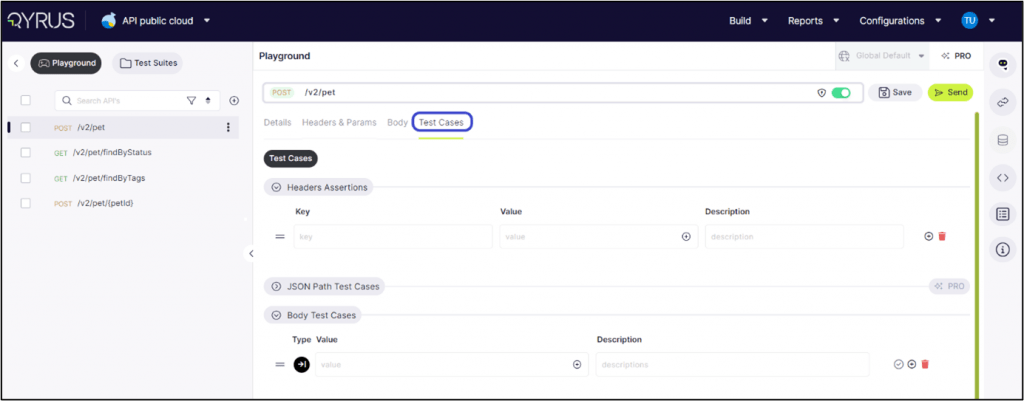
Step 1: Click on Nova and choose to generate test cases.
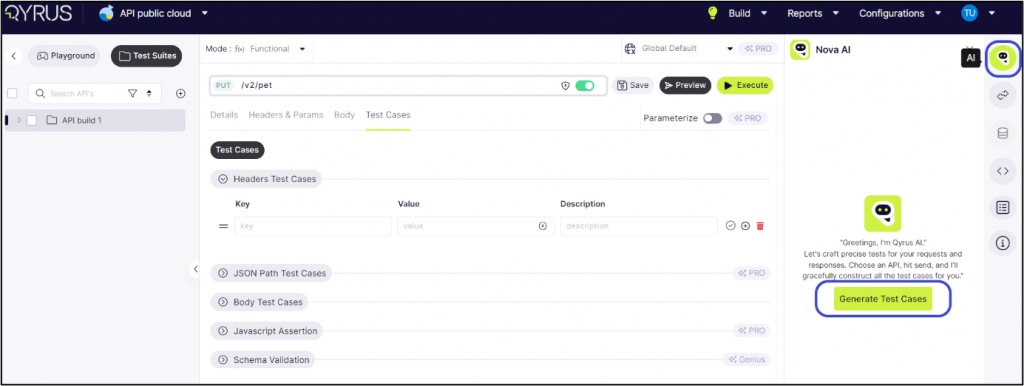
Step 2: The AI will analyze the API and generate ideal test cases that are best suited to test its capabilities.
Step 3: Mark the different test cases, such as header and body test cases, in the tick box.

Step 4: click on Add test cases to API.
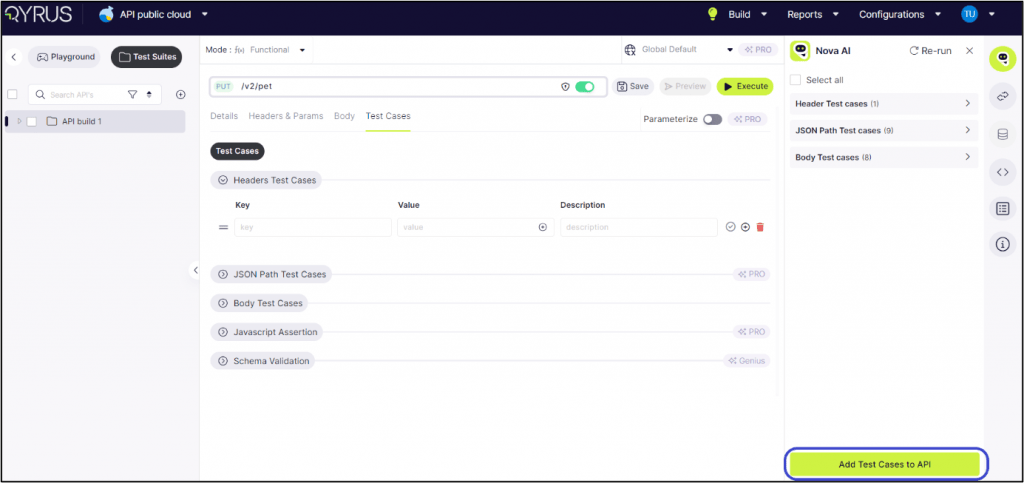
Step 5: Click on Headers Test Cases now to see the key, value and description.
Step 6: Click on Send.
Step 7: The response tab is opened and shows the body and header used for the test case.

Step 8: The status shows ‘200 OK’, which means the test was successful and the API is completely functional.
Step 9: To extract its path, click on ‘Path Extractor’ and select JSON path/ X-path.

Step 10: Click on the play button to extract the path. It will show the path, as highlighted in the image below.
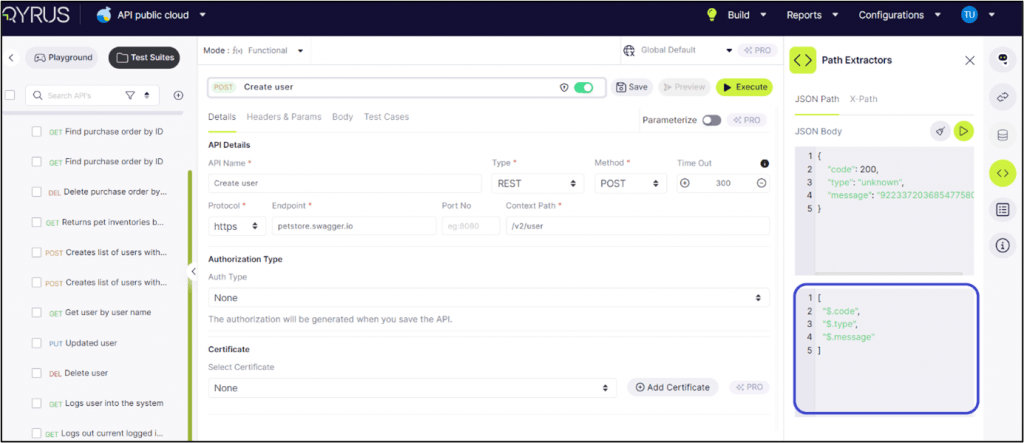
Step 11: Similarly, for Body Test Cases. AI will suggest all the test cases.

Option 2: Using WSDL Format
Step 1: Navigate to the Add API button and select “WSDL” if your API utilizes the WSDL format.
Step 2: Enter the WSDL URL:
Add the URL of your WSDL file. Consider using a sample WSDL URL for a practical example or to familiarize yourself with the procedure.
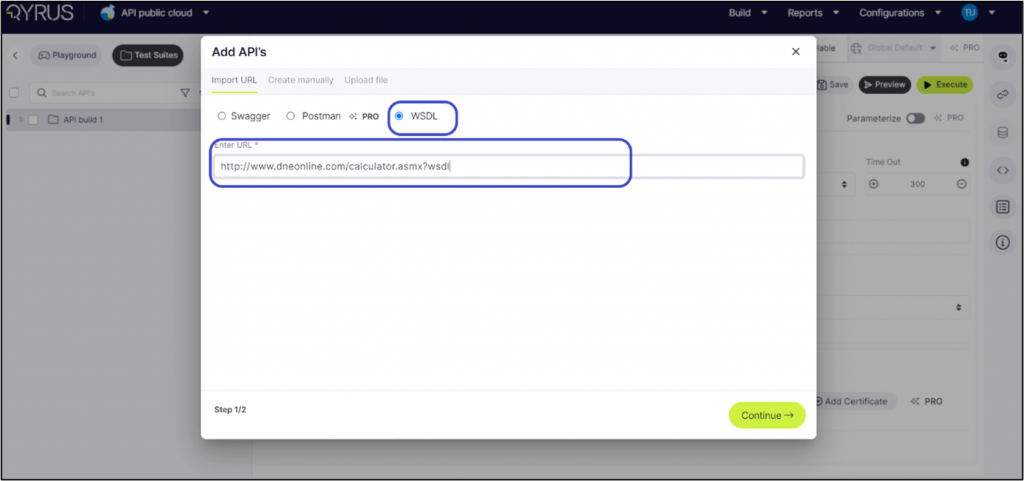
Step 3: Initiate Import by Clicking ‘Continue’:
Modifying API
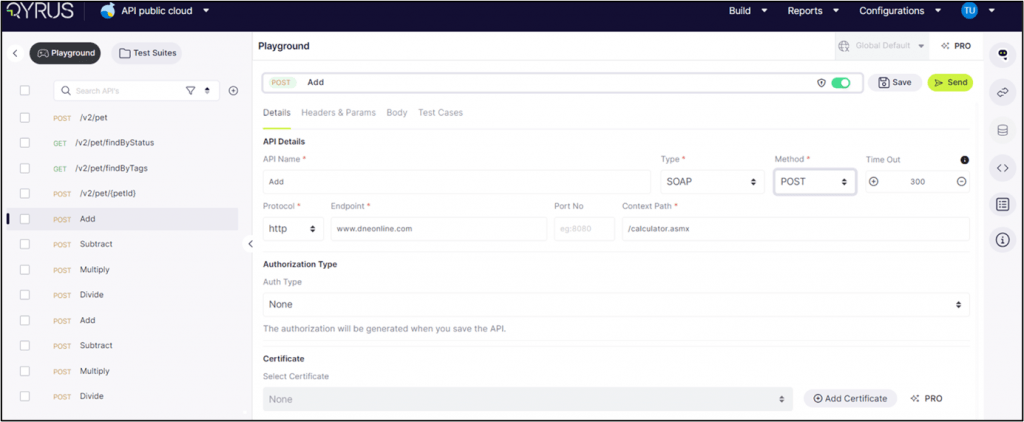
Select an API: The main screen will display all its intricate details under the ‘Details’ tab. Here, you can modify the API to fit your exact needs.
API Name and Type: Users can view the API’s name and select its type (REST, SOAP) to ensure proper handling within the platform.
Method Selection: Users can designate the appropriate method (GET, POST, PUT, DELETE, PATCH) based on the desired action the API should perform, thereby defining its interaction with the server.
Timeout Setting: Users have the option to set a timeout in milliseconds.
Protocol Configuration: The platform facilitates toggling between HTTP and HTTPS protocols, allowing users to secure API calls by opting for HTTPS where applicable.
Endpoint and Context Path: In this section, users can modify the API’s endpoint URL and specify the context path, which is essential for accurately directing API calls.
Authorization Type: Users can select the authorization type that aligns with the API’s security requirements, ensuring secure interactions, whether it involves Basic Auth or OAuth. The authorization will be generated when you save the API.
In the Headers and Params tab, users can add, delete, and modify both the key and value, as well as the type of each parameter. This functionality allows for precise customization and configuration of API requests, ensuring accurate and effective testing.
Within the Body tab, users encounter an array of options for inputting data. They can choose to enter the code directly or upload a file.
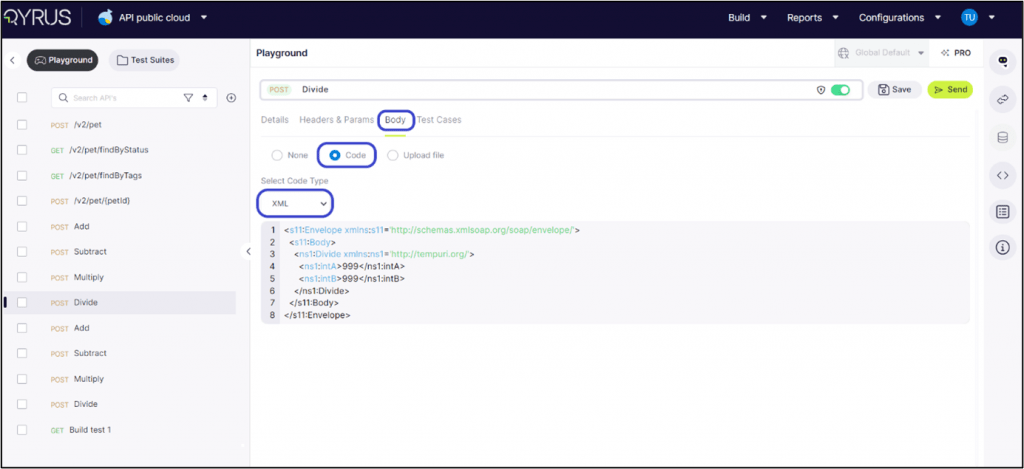
In the code type for WSDL, the system shows the XML code type.
On the Test Cases tab, users are presented with options to define test cases for headers assertions, and the body of the API request or response. This functionality allows for thorough testing and validation of various aspects of the API’s behavior, ensuring reliability and consistency in its performance.
Type 2: Create Manually
Click on Add API and choose the ‘Create manually’ option
Select the API type and give a name.

Click on Create API to begin the manual process.
Enter all the required details for the API.
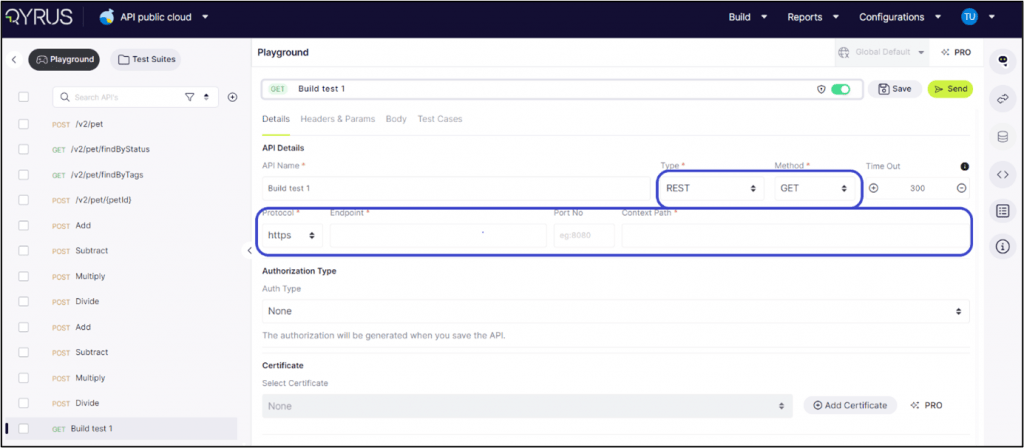
API Name and Type: Users can view the API’s name and select its type (REST, SOAP) to ensure proper handling within the platform.
Method Selection: Users can designate the appropriate method (GET, POST, PUT, DELETE, PATCH) based on the desired action the API should perform, thereby defining its interaction with the server.
Timeout Setting: Users have the option to set a timeout in milliseconds.
Protocol Configuration: The platform facilitates toggling between HTTP and HTTPS protocols, allowing users to secure API calls by opting for HTTPS where applicable.
Endpoint and Context Path: In this section, users can modify the API’s endpoint URL and specify the context path, which is essential for accurately directing API calls.
Authorization Type: Users can select the authorization type that aligns with the API’s security requirements, ensuring secure interactions, whether it involves Basic Auth or OAuth. The authorization will be generated when you save the API.
In the Headers and Params tab, users can add, delete, and modify both the key and value, as well as the type of each parameter. This functionality allows for precise customization and configuration of API requests, ensuring accurate and effective testing.
Within the Body tab, users have two options for inputting data. They can opt to either enter the code directly or upload a file.

Enter a unique key name and upload the body by uploading the file.
The Test Cases tab, users need to manually define test cases for headers assertions, and the body of the API request or response. This functionality allows for thorough testing and validation of various aspects of the API’s behavior, ensuring reliability and consistency in its performance.
Type 3: Upload File
To manually upload the file, click on the Swagger or WSDL type, upload the respective type of file, and click on continue.

Note: Follow the same steps as for the Import URL.
Test Suite Creation
Step 1: Once the APIs are uploaded and tested, the user needs to add them to a test suite. Select the API, click on more options, and click on Save to Test Suite.
Step 2: A pop-up box will prompt the user to name their Test Suite if one hasn’t been created already.
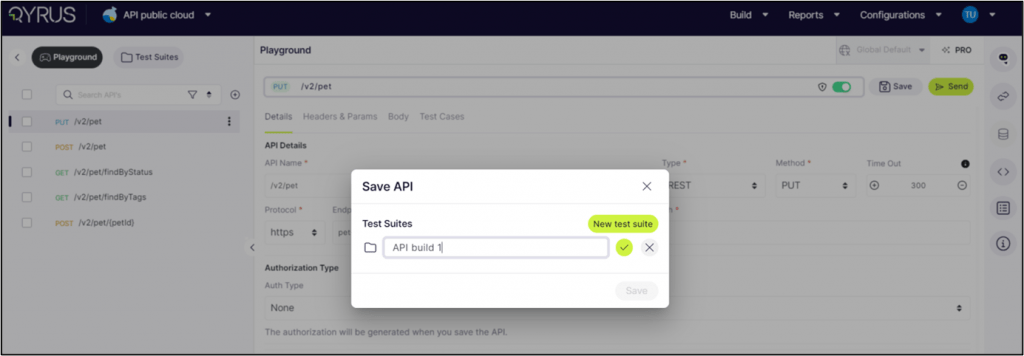
Step 3: Enter the desired name into the provided field and click the tick box to confirm.
Step 4: Navigate to the testing suite after the APIs are added to the testing suite section.
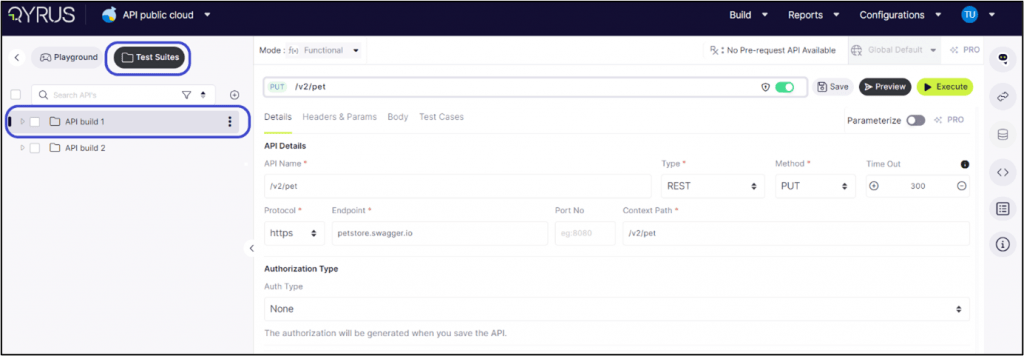
Step 5: Here, users can test multiple APIs simultaneously. Click on ‘Preview’ to inspect the request body and response.
Step 6: After previewing, click on ‘Execute’. This action will initiate the API tests, push them, and initiate the test run.
Step 7: The platform will begin running the tests and subsequently navigate the user to the report stage for detailed analysis and review.
Check Functional Reports to get an analysis of the API tests.
Conclusion
We’ve explored the transformative power of QAPi. With its intuitive features, smart testing capabilities, and user-friendly interface, our aim with this application is to redefine how API testing is conducted. As organizations embrace this innovation, they open doors to faster, more comprehensive testing, boosting efficiency and ensuring the reliability of their applications.
Creating and managing projects under the freemium model on our platform is straightforward and flexible, this allows you to tailor your API setup to your project’s specific needs. The API onboarding process is designed to be seamless, ensuring you can quickly integrate and manage your APIs using our robust API dashboard.
We hope this guide has helped get you started with creating and managing APIs in your Test Suite using our free API testing tool. If you need further assistance or have any additional questions, please get in touch with Qyrus for more help. We would be happy to assist you and guide to solve your problems!


