Project Creation under QAPi (Qyrus API Software) Pro Model

Tailored for developers, administrators, and product managers who demand more from their tools, this model offers an array of sophisticated features designed to streamline your workflow and elevate your API projects to new heights. By providing a robust framework for developers to interact with various software components, QAPi Pro allows businesses to create custom solutions tailored to their specific needs.
Our premium model provides access to enhanced functionalities such as automated testing, detailed analytics, and seamless integrations with other tools in your tech stack. This ensures that you not only create and manage APIs with ease but also maintain their performance and reliability at the highest standards. The premium model is about empowering your team to work smarter, not harder, by providing the resources needed to handle complex API requirements effortlessly.
Discover how our premium model can enhance your productivity and ensure the reliability of your applications; you can create API solutions that support your team’s growth.
This blog may interest you: 6 Key Benefits of API Testing
API Onboarding Index
Project Creation under the Pro model
Step 1: From the dashboard, click on the ‘Playground’.
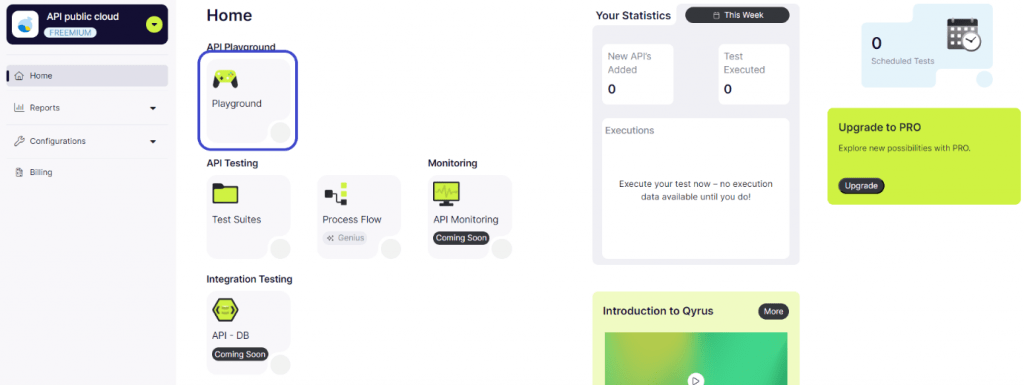
Step 2: Click on Add ‘API’s’
Type 1: Import URL
Option 1: Using Swagger Format
Please refer to the blog API Onboarding: Project creation under the Freemium model for more details.
Option 2: Using Postman Format (Available only in Pro version)
Step 1: In the playground, click on Add API.
(In Pro model, you get access to Postman URLs)
Step 2: Click on Postman, and upload the URL (for example): https://alexwohlbruck.github.io/cat-facts/

Step 3: Initiate Import by Clicking ‘Continue’:
Note: Follow the same steps as the Import URL. Use Nova AI for generating test cases.
Option 3: Using WSDL Format
Step 1: Navigate to the Add API button and select “WSDL” if your API utilizes the WSDL format.
Step 2: Enter the WSDL URL:
Add the URL of your WSDL file. Consider using a sample WSDL URL for a practical example or to familiarize yourself with the procedure.
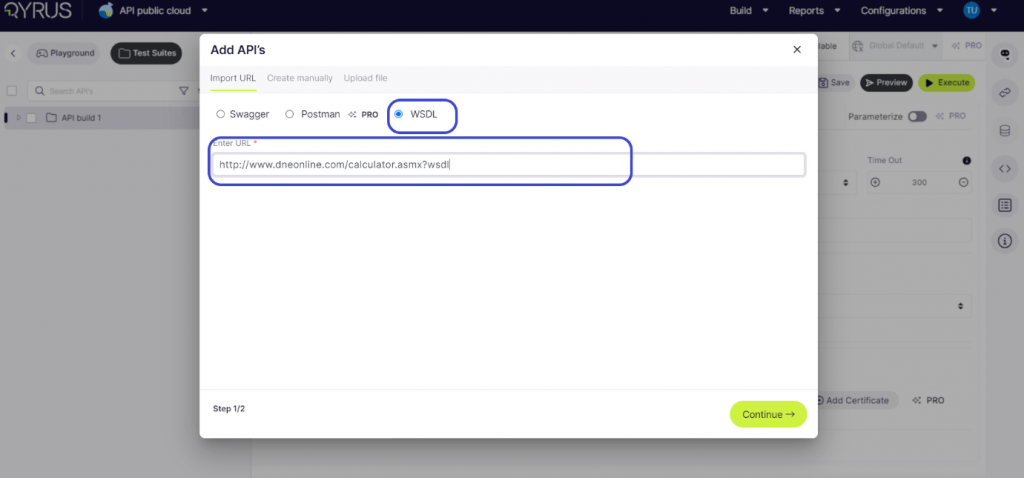
Step 3: Initiate Import by Clicking ‘Continue’:
Modifying API

Select an API: The main screen will display all its intricate details under the ‘Details’ tab. Here, you can modify the API to fit your exact needs.
API Name and Type: Users can view the API’s name and select its type (REST, SOAP) to ensure proper handling within the platform.
Method Selection: Users can designate the appropriate method (GET, POST, PUT, DELETE, PATCH) based on the desired action the API should perform, thereby defining its interaction with the server.
Timeout Setting: Users have the option to set a timeout in milliseconds.
Protocol Configuration: The platform facilitates toggling between HTTP and HTTPS protocols, allowing users to secure API calls by opting for HTTPS where applicable.
Endpoint and Context Path: In this section, users can modify the API’s endpoint URL and specify the context path, which is essential for accurately directing API calls.
Authorization Type: Users can select the authorization type that aligns with the API’s security requirements, ensuring secure interactions, whether it involves Basic Auth or OAuth. The authorization will be generated when you save the API.
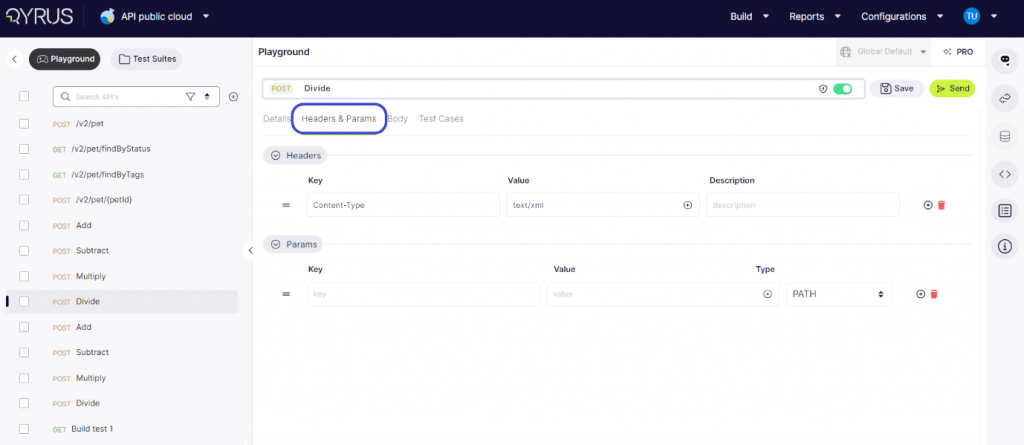
In the Headers and Params tab, users can add, delete, and modify both the key and value, as well as the type of each parameter. This functionality allows for precise customization and configuration of API requests, ensuring accurate and effective testing.
Within the Body tab, users encounter an array of options for inputting data. They can choose to enter the code directly or upload a file.
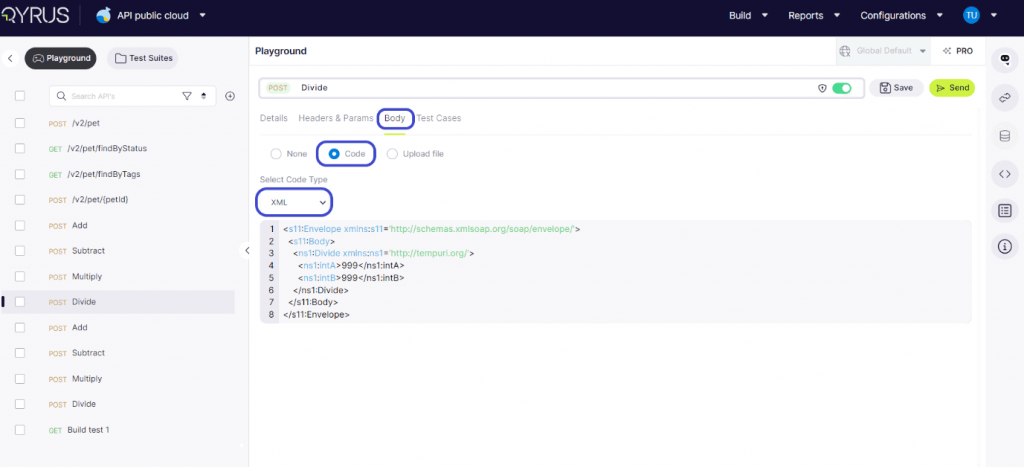
In the code type for WSDL, the system shows the XML code type.
On the Test Cases tab, users are presented with options to define test cases for headers assertions, and the body of the API request or response. This functionality allows for thorough testing and validation of various aspects of the API’s behavior, ensuring reliability and consistency in its performance.
Type 2: Create Manually
Click on Add API and choose the ‘Create manually’ option
Select the API type and give a name.
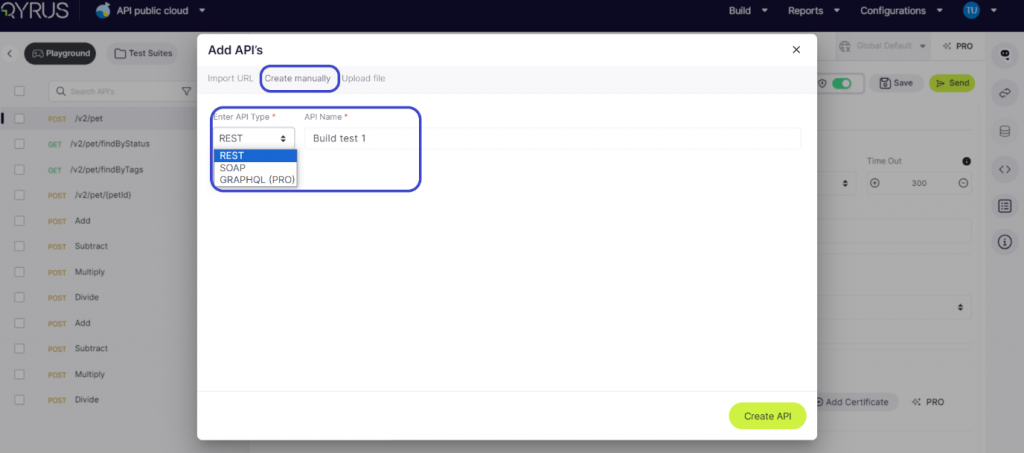
Click on Create API to begin the manual process.
Enter all the required details for the API.
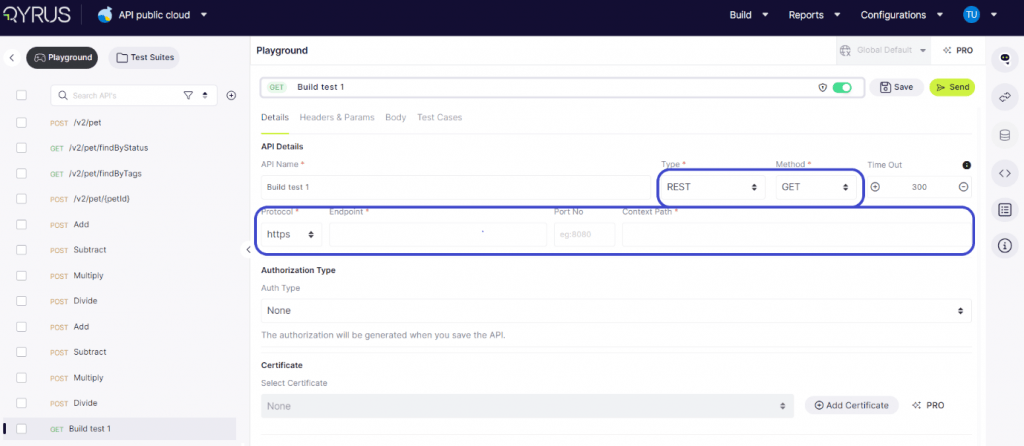
API Name and Type: Users can view the API’s name and select its type (REST, SOAP) to ensure proper handling within the platform.
Method Selection: Users can designate the appropriate method (GET, POST, PUT, DELETE, PATCH) based on the desired action the API should perform, thereby defining its interaction with the server.
Timeout Setting: Users have the option to set a timeout in milliseconds.
Protocol Configuration: The platform facilitates toggling between HTTP and HTTPS protocols, allowing users to secure API calls by opting for HTTPS where applicable.
Endpoint and Context Path: In this section, users can modify the API’s endpoint URL and specify the context path, which is essential for accurately directing API calls.
Authorization Type: Users can select the authorization type that aligns with the API’s security requirements, ensuring secure interactions, whether it involves Basic Auth or OAuth. The authorization will be generated when you save the API.
In the Headers and Params tab, users can add, delete, and modify both the key and value, as well as the type of each parameter. This functionality allows for precise customization and configuration of API requests, ensuring accurate and effective testing.
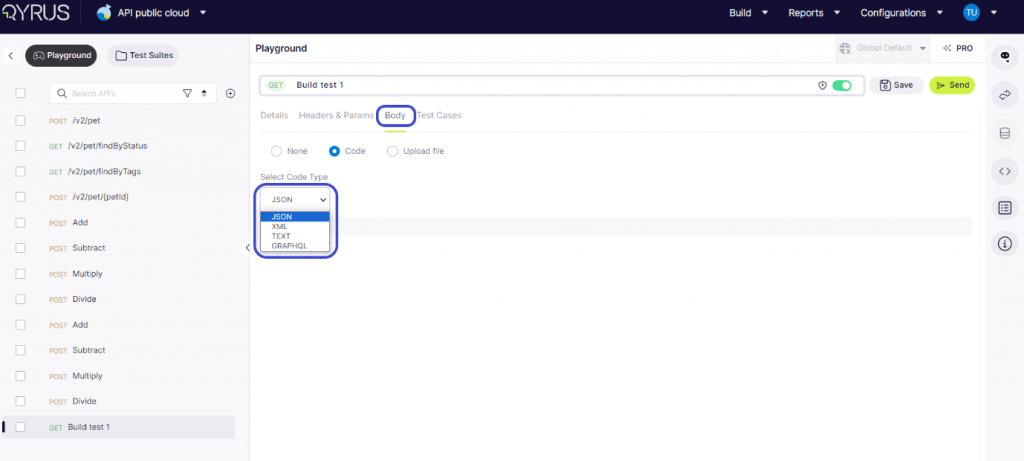
Within the Body tab, users have two options for inputting data. They can opt to either enter the code directly or upload a file.
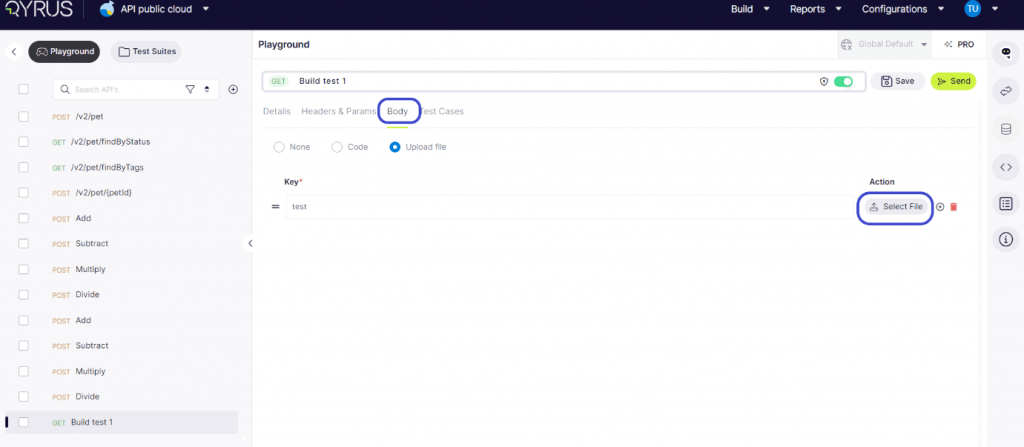
Enter a unique key name and upload the body by uploading the file.
The Test Cases tab, users need to manually define test cases for headers assertions, and the body of the API request or response. This functionality allows for thorough testing and validation of various aspects of the API’s behavior, ensuring reliability and consistency in its performance.
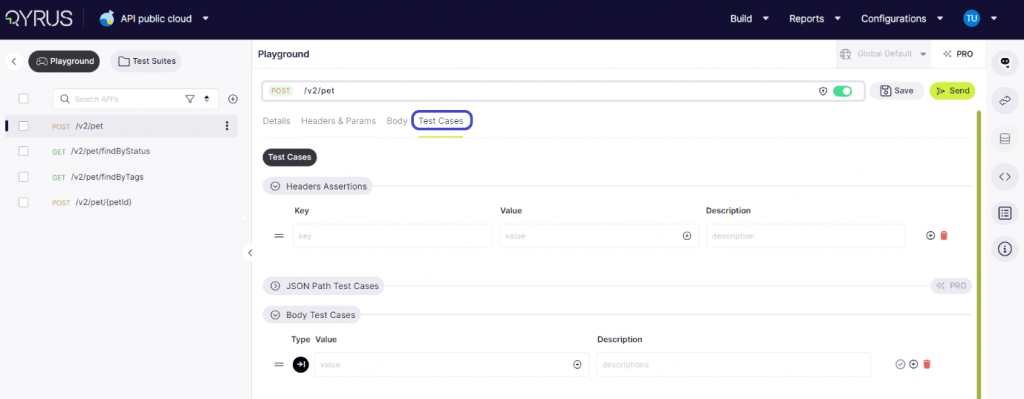
Step 1: Click on Nova and choose to generate test cases.
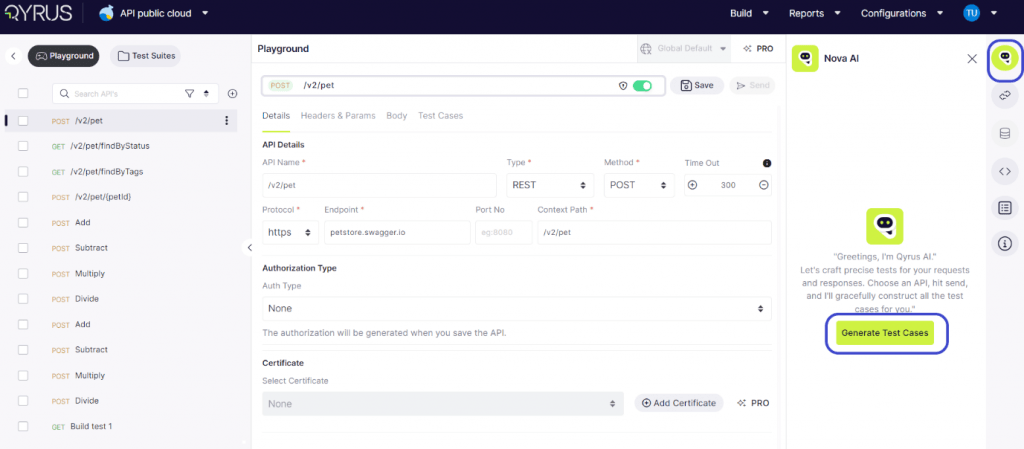
Step 2: The AI will analyze the API and generate ideal test cases that are best suited to test its capabilities.
Step 3: Mark the different test cases, such as header and body test cases, in the tick box.
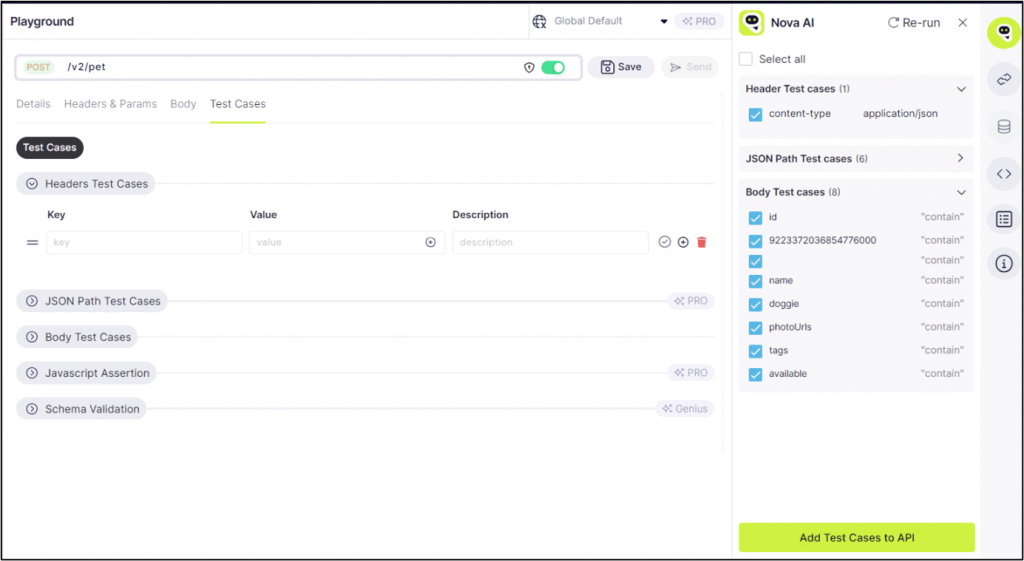
Step 4: click on Add test cases to API.
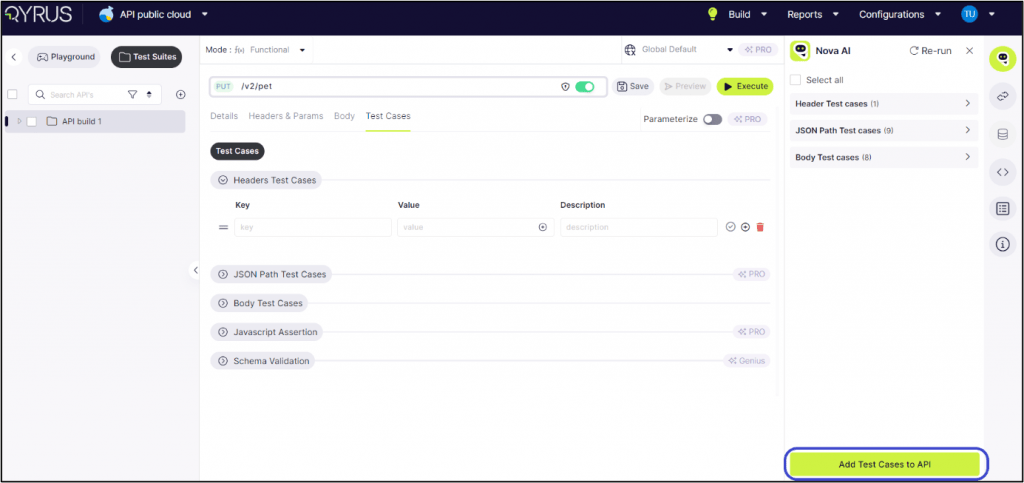
Step 5: Click on Headers Test Cases now to see the key, value and description.
Step 6: Click on Send.
Step 7: The response tab is opened and shows the body and header used for the test case.
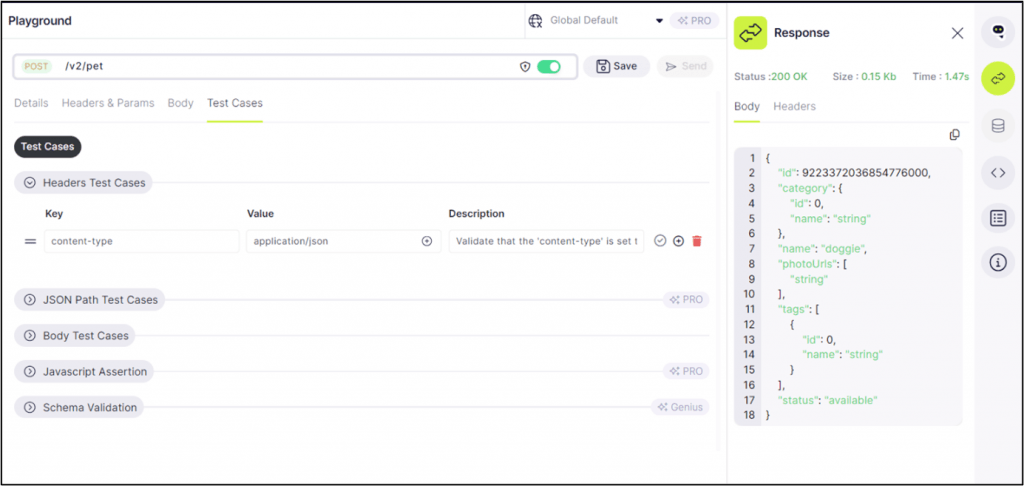
Step 8: The status shows ‘200 OK’, which means the test was successful and the API is completely functional.
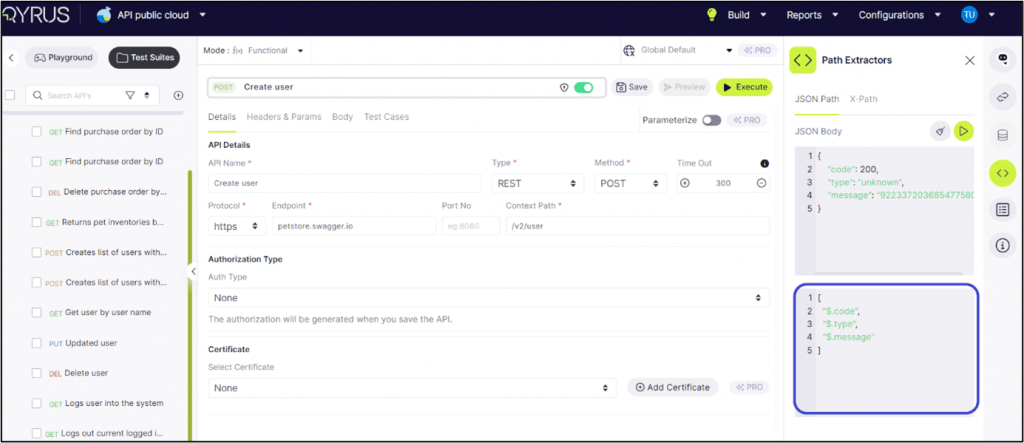
Step 9: To extract its path, click on ‘Path Extractor’ and select JSON path/ X-path.

Step 10: Click on the play button to extract the path. It will show the path, as highlighted in the image below.
Step 11: Similarly, for Body Test Cases. AI will suggest all the test cases.

Step 12: In Pro mode, JSON path test cases are also accessible.

Step 13: For each of the test cases, open the Path Extractor to check the path.
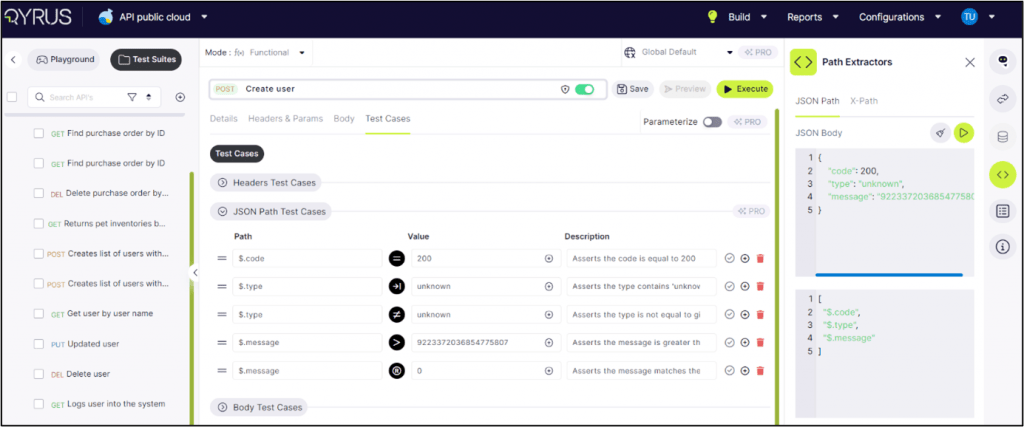
The description lists out the reasoning for the test case, when creating test cases manually it is best recommended to define them.
Type 3: Upload File
To manually upload the file, click on the Swagger or WSDL type, upload the respective type of file, and click on continue.

Note: Follow the same steps as for the Import URL.
Conclusion
The premium model is not just about managing APIs; it is about revolutionizing the entire API lifecycle. By providing an intuitive interface and smart testing features, our premium model offers Pro Tools (API features) that shows how API access can drive integration, innovation, and growth. By creating APIs, businesses can unlock new opportunities, enhance collaboration, and ensure their systems are scalable and efficient.
APIs make it easier for different teams within an organization to collaborate on projects. For instance, the IT department can create APIs that allow the marketing team to access real-time data and analytics, fostering a more collaborative and agile working environment. This level of sophistication empowers your team to handle complex API requirements with ease, reducing downtime and boosting overall productivity.
For more information or personalized assistance, reach out to Qyrus. We are here to help you achieve excellence to create APIs, manage them and beyond. Embrace the future of API software with our premium model and take your projects to the next level. Try QAPi now.
Watch what our Qyrus President, Ravi Sundaram, has to say about QAPi.


