Sanity testing has come a long way from manual smoke tests. (Recent research by Ehsan et) reveals that sanity tests are now critical for catching RESTful API issues early—especially authentication and endpoint failures—before expensive test suites run. The study found that teams implementing proper sanity testing reduced their time-to-detection of critical API failures by up to 60%.
But here’s where it gets interesting:
Sanity testing is no longer just limited to checking if your API responds with a 200 status code. The testing tools on the market are now using Large Language Models to synthesize sanity test inputs for deep learning library APIs, reducing manual overhead while increasing accuracy.
We’re witnessing the start of intelligent sanity testing.
Wait, before you get ahead of yourself, let’s set some context first.
What are sanity checks in API testing?
The definition of sanity checks is:
Sanity checks are used as a quick, focused, and shallow test (or a group of tests) performed after minor code changes, bug fixes, or enhancements to an API.
The purpose of these sanity tests is to verify that the specific changes made to the API are working as required. And that they haven’t affected any existing, closely related functionality.
Think of it as a “reasonable” check. It’s not about exhaustive testing, but rather a quick validation.
Main features of sanity tests in API testing:
• Narrow and Deep Focus: It concentrates on the specific API endpoints or functionalities that have been modified or are directly affected when a change is made.
• Post-Change Execution: In most cases it’s performed after a bug fix, a small new feature implementation, or a minor code refactor.
• Subset of Regression Testing: While regression testing aims to ensure all existing functionality remains intact, sanity testing focuses on the impact of recent changes on a limited set of functionalities.
• Often Unscripted/Exploratory: While automated sanity checks are valuable, they can also be performed in an ad-hoc or random manner by experienced testers, focusing on the immediate impact of changes.
Let’s put it in a scenario: Example of a sanity test
Imagine you have an API endpoint /user/{id} that retrieves user details. A bug is reported where the email address is not returned correctly for a specific user.
• Bug fix: The Developer deploys a fix.
• Sanity check: You would quickly call /users/{id} for that specific user (and maybe a few others to ensure no general breakage) to verify that the email address is now returned correctly.
The goal here is not to re-test every single field or every other user scenario, but only the affected area.
Why do we need them?
Sanity checks are crucial for several reasons:
1️⃣ Early Detection of Critical Issues: They help catch glaring issues or regressions introduced by recent changes early in the development cycle. If a sanity check fails, it indicates that the build is not stable, and further testing would be a waste of time and resources
2️⃣ Time and Cost Savings: By quickly identifying faulty builds, sanity checks prevent the QA team from wasting time and effort on more extensive testing (like complete regression testing) on an unstable build.
3️⃣ Ensuring Stability for Further Testing: A successful sanity check acts as a gatekeeper, confirming that the API is in a reasonable state to undergo more comprehensive testing.
4️⃣ Focused Validation: When changes are frequent, sanity checks provide a targeted way to ensure that the modifications are working as expected without causing immediate adverse effects on related functionality
5️⃣ Risk Mitigation: They help mitigate the risk of deploying a broken API to production by catching critical defects introduced by small changes.
6️⃣ Quick Feedback Loop: Developers receive quick feedback on their fixes or changes, allowing for rapid iteration and correction.
Difference Between Sanity and Smoke Testing
While both sanity and smoke testing are preliminary checks performed on new builds, they have distinct purposes and scopes:
| Feature | Sanity Testing | Smoke Testing |
|---|---|---|
| Purpose | To verify that specific, recently changed or fixed functionalities are working as intended and haven't introduced immediate side effects. | To determine if the core, critical functionalities of the entire system are stable enough for further testing. |
| Scope | Narrow and Deep: Focuses on a limited number of functionalities, specifically those affected by recent changes. | Broad and Shallow: Covers the most critical "end-to-end" functionalities of the entire application. |
| When used | After minor code changes, bug fixes, or enhancements. | After every new build or major integration, at the very beginning of the testing cycle. |
| Build Stability | Performed on a relatively stable build (often after a smoke test has passed). | Performed on an initial, potentially unstable build. |
| Goal | To verify the "rationality" or "reasonableness" of specific changes. | To verify the "stability" and basic functionality of the entire build. |
| Documentation | Often unscripted or informal; sometimes based on a checklist. | Usually documented and scripted (though often a small set of high-priority tests). |
| Subset Of | Often considered a subset of Regression Testing. | Often considered a subset of Acceptance Testing or Build Verification Testing (BVT). |
| Q-tip | Checking if the specific new part you added to your car engine works and doesn't make any unexpected noises. | Checking if the car engine starts at all before you even think about driving it. |
In summary:
• You run a smoke test to see if the build “smokes” (i.e., if it has serious issues that prevent any further testing). If the smoke test passes, the build is considered stable enough for more detailed testing.
• You run a sanity test after a specific change to ensure that the change itself works and hasn’t introduced immediate, localized breakage. It’s a quick check on the “sanity” of the build after a modification.
Both are essential steps in a good and effective API testing strategy, ensuring quality and efficiency throughout the development lifecycle.
Reddit users are the best, here’s why:
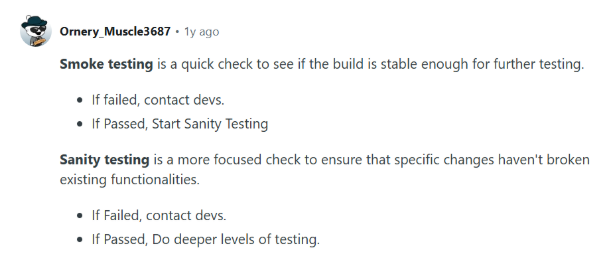
How do you perform sanity checks on APIs?
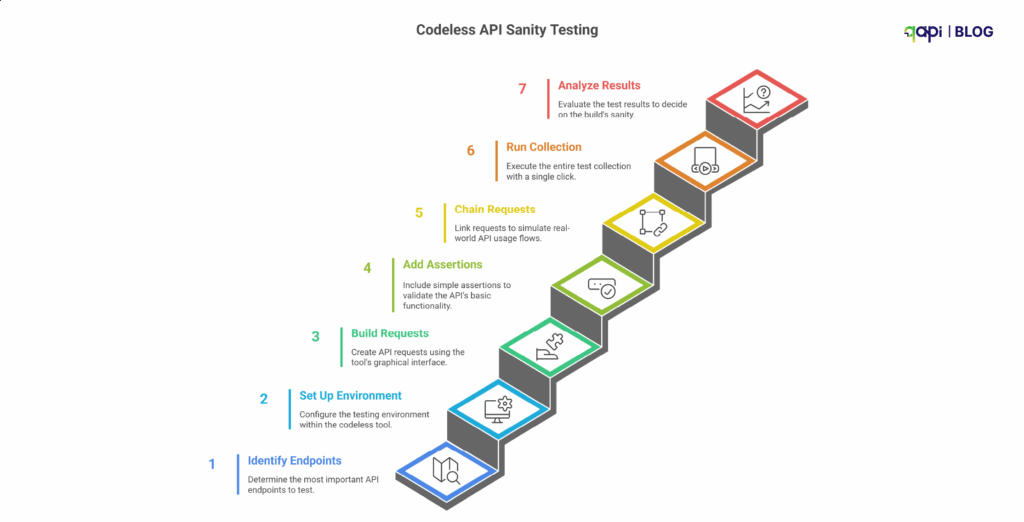
Here is a step-by-step, simple guide on using a codeless testing tool.
Step 1: Start by Identifying the “Critical Path” Endpoints
As mentioned earlier, you don’t have to test everything.
You have to identify the handful of API endpoints that are responsible for the core functionality of your application.
Ask yourself, you’re the team responsible: “If this one call fails, is the entire application basically useless?”
Examples of critical path endpoints:
Examples:
• POST /api/v1/login → Can users log in?
• GET /api/v1/users/me → Can users retrieve their profile?
• GET /api/v1/products → Can users see key data?
• POST /api/v1/cart → Can users complete a core action like adding items?
• Primary Data Retrieval: GET /api/v1/users/me or GET /api/v1/dashboard - Can a logged-in user retrieve their own essential data?
• Core List Retrieval: GET /api/v1/products or GET /api/v1/orders - Can the main list of data be displayed?
• Core Creation: POST /api/v1/cart - Can a user perform the single most important “create” action (e.g., add an item to their cart)?
Your sanity suite should have maybe 5-10 API calls, not 50!
Step 2: Set Up Your Environment in the Tool
Codeless tools excel at managing environments. Before you build the tests, create environments for your different servers (e.g., Development, Staging, Production).
• Create an Environment: Name it for e.g. “Staging Sanity Check.”
• Use Variables: Instead of hard-coding the URL, create a variable like {{baseURL}} and set its value to
e.g. https://staging-api.yourcompany.com.
This will make your tests reusable across different environments.
• Store Credentials Securely: Store API keys or other sensitive tokens as environment variables (often marked as “secret” in the tool).
Step 3: Build the API Requests Using the GUI
This is the “easy” part. You don’t have to write any code to make the HTTP request.
- Create a “Collection” or “Test Suite”: Name it, for example, “API Sanity Tests.”
- Add Requests: For each critical endpoint we identified in Step 1, create a new request in your collection.
- Configure each request using the UI:
• Select the HTTP Method (GET, POST, PUT, etc.).
• Enter the URL using your variable: {{baseURL}}/api/v1/login.
• Add Headers (e.g., Content-Type: application/json).
• For POST or PUT requests, add the request body in the “Body” tab.
You have now managed to create the “requests” part of your sanity suite
Step 4: Add Simple, High-Value Assertions
A request that runs isn’t a test. A test checks that the response is what you expect. Codeless tools have a GUI for this.
For each request, add a few basic assertions:
Add checks like:
• Status Code: Is it 200 or 201?
• Response Time: Is it under 800ms?
• Response Body: Does it include key data? (e.g., “token” after login)
• Content-Type: Is it application/json?
qAPI does it all for you with a click! Without any special request.
Keep assertions simple for sanity tests. You don’t need to validate the entire response schema, just confirm that the API is alive and returning the right kind of data.
Step 5: Chain Requests to Simulate a Real Flow
APIs rarely work in isolation. Users log in, then fetch their data. If one step breaks, the whole flow breaks.
Classic Example: Login and then Fetch Data
1. Request 1: POST /login
• In the “Tests” or “Assertions” tab for this request, add a step to extract the authentication token from the response body and save it to an environment variable (e.g., {{authToken}}).
Most tools have a simple UI for this (e.g., “JSON-based extraction”).
2. Request 2: GET /users/me
• In the “Authorization” or “Headers” tab for this request, use the variable you just saved.
For example, set the Authorization header to Bearer {{authToken}}.
Now you get a confirmation that the endpoints work in isolation, but also that the authentication part works too.
Step 6: Run the Entire Collection with One Click
You’ve built your small suite of critical tests. Now, use the qAPIs “Execute” feature.
• Select your “API Sanity Tests” collection.
• Select your “Staging” environment.
• Click “Run.”
The output should be a clear, simple dashboard: All Pass or X Failed.
Step 7: Analyze the Result and Make the “Go/No-Go” Decision
This is the final output of the sanity test.
• If all tests pass (all green): The build is “good.” You can notify the QA team that they can begin full, detailed testing.
• If even one test fails (any red): The build is “bad.” Stop! Do not proceed with further testing. The build is rejected and sent back to the development team. This failure should be treated as a high-priority bug.
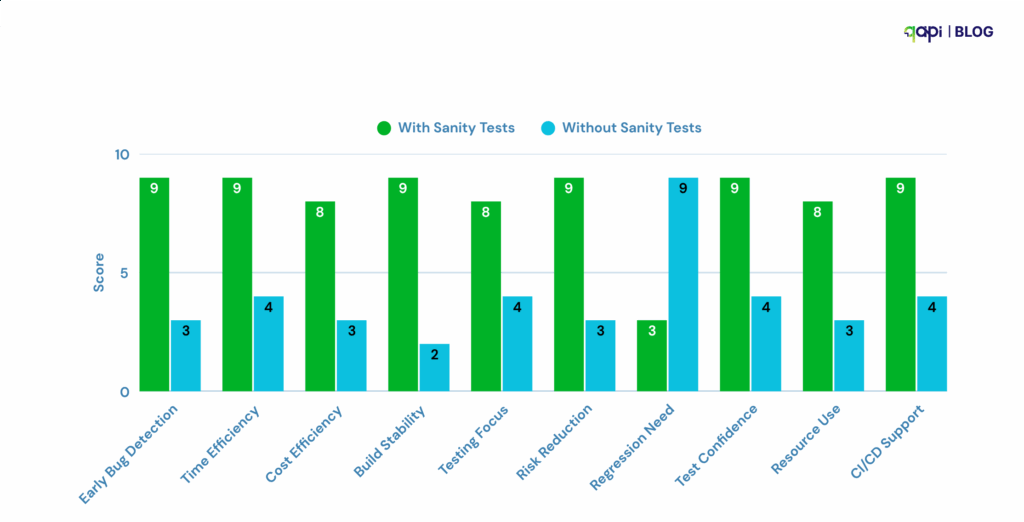
The Payoff: Why Sanity Check Matters
By following these steps, you create a fast, reliable “quality gate.”
• For Non-Technical Leaders: This process saves immense time and money. It prevents the entire team from wasting hours testing an application that was broken from the start. It gives you a clear “Go / No-Go” signal after every new build.
• For Technical Teams: This automates the most repetitive and crucial first step of testing. It provides immediate feedback to developers, catching critical bugs when they are cheapest and easiest to fix.
For a more technical deep dive into the power of basic sanity validations, this GitHub repository offers a good example.
While it focuses on machine learning datasets, the same philosophy applies to API testing: start with fast, lightweight checks that catch broken or invalid outputs before you run full-scale validations.
It follows all the steps we discussed above, and with a sample in hand, things will be much easier for you and your team.
Why are sanity checks important in API testing?
Sanity checks are important in API testing because they quickly validate whether critical API functionality is working after code changes or bug fixes. They act as a fast, lightweight safety layer before we get into deeper testing.
But setting them up manually across tools, environments, and auth flows is time-consuming.
Source:(code intelligence, softwaretestinghelp.com, and more)
That’s where qAPI fits in.
qAPI lets you design and automate sanity tests in minutes, without writing code. You can upload your API collection, define critical endpoints, and run a sanity check in one unified platform.
Here’s how qAPI supports fast, reliable sanity testing:
• Codeless Test Creation: Add tests for your key API calls (like /login, /orders, /products) using a simple GUI—no scripts required.
• Chained Auth Flows: Easily test auth + protected calls together using token extraction and chaining.
• Environment Support: Use variables like {{baseURL}} to switch between staging and production instantly.
• Assertions Built-In: Set up high-value checks like response code, body content, and response time with clicks, not code.
• One-Click Execution: Run your full sanity check and see exactly what passed or failed before any detailed testing begins.
Whether you’re a solo tester, a QA lead, or just getting started with API automation, qAPI helps you implement sanity testing the right way—quickly, clearly, and repeatedly.
Sanity checks are your first line of defense. qAPI makes setting them up as easy as running them.
Run critical tests faster, catch breakages early, and stay ahead of release cycles—all in one tool.
Hate writing code to test APIs? You’ll love our no-code approach